What's new
Van's Air Force

Don't miss anything! Register now for full access to the definitive RV support community.

Engine compartment pictures of a Van's built RV-12iS

subpar_bucker

Well Known Member
I was in Sebring FL this week attending some Rotax maintenance courses at Lockwood. On Friday I was lucky enough to catch their RV-12iS during an oil change. I grabbed a bunch of photos and put them in a google photos album:

https://photos.app.goo.gl/3c8v2Sa61HVvDR5o9

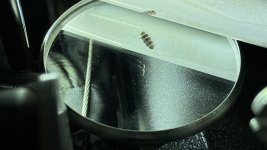
There were a couple of things I thought worth noting: there's a piece of tubing attached to the throttle cable a few inches prior to where it attaches to the throttle body. I know of at least one person who has detected a location where their throttle cable was rubbing its way through the powder coating on their plane. I also noticed some RVT on the pitot tubing just aft of the plastic block the rigid portions passed through right behind the propeller hub.

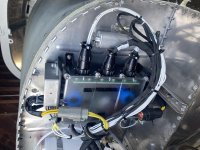
I've also attached a photo of the beautiful layout of the wiring around the fuse box. Mine isn't nearly as pretty as this one!
 

Attachments

  • PXL_20230224_143845242.MP.jpg
    PXL_20230224_143845242.MP.jpg
    400.2 KB · Views: 506
Thanks for posting these. I'm in the process of routing hoses right now. It's nice seeing an example of how someone else has done this.
 
My throttle cable was routed -under- the engine mount support tube.. instead of -over- it. After about 300 hours, I noticed it touching, along with what looked like brown rust around the area. I threw a plastic tube on the cable -- just like Lockwood's plane.

Finally this week, I re-route the cable the proper way.. there is still potential for rubbing, so I left the tube on. Here is the damage it did. Its mostly powder coating that wore away.. but it did start to eat into the metal. I'm going to continue to monitor that area, but I don't expect anything to develop.
 

Attachments

  • IMG_4952.jpg
    IMG_4952.jpg
    231.4 KB · Views: 199
Lockwood SLSA

The pictures of this firewall forward installation are of an S-LSA RV-12iS built by Van's Aircraft Assembly Division. This is an example of the high quality work done by the Van's AAD team everyday at the Aurora, OR facility.

If you would like to have a hand in building these beautiful aircraft be sure to check out our "Careers" webpage.
.
 

Attachments

  • 12108 Front Right.jpg
    12108 Front Right.jpg
    451.3 KB · Views: 172
This is super helpful and timely for us at HP Aircraft since we have been approached for a possible aircraft design using a Rotax.

The engine mount is quite unusual, at least for us in the Lycoming world. It is not clear from the photos how the nose gear strut attaches to the mount and/or firewall. Could someone post a picture that shows how that works?
Also would be super helpful if someone could post a picture of the engine mount hung on the firewall with nothing else attached.

I'm curious what the structure is like behind the firewall in the RV-12 to carry the engine mount loads out to the fuselage longerons.
 
I'm also curious about what looks like a gas cylinder attachment brackets in front of the battery. I'm guessing that that has something to do with the induction system, since there is no duct attached to the throttle body. Is the mount for a filter canister or something like that?
 
I'm also curious about what looks like a gas cylinder attachment brackets in front of the battery. I'm guessing that that has something to do with the induction system, since there is no duct attached to the throttle body. Is the mount for a filter canister or something like that?

That is the mount for the oil tank.
Likely removed for cleaning during a 100 hr inspection.
 
What are the plastic tabs? I haven't seen those before. Are they a homemade thing or a stock item of some sort?

I have some concern about the throttle cable rubbing on the top of the engine mount support but I don't see a way around it.

Also, are they using an Adel clamp combo as a standoff where the throttle cable first snakes under the engine mount tube?
 
That is interesting Bob, because the production SLSA airplanes are built with the exact same parts that ship in the ELSA kits…..

That's obviously not true. The question is whether Stein has that much variation in wire lengths, or maybe the factory has a special request for them them to be longer?
 

Attachments

  • IMG_4456.jpg
    IMG_4456.jpg
    414.6 KB · Views: 120
That's obviously not true. The question is whether Stein has that much variation in wire lengths, or maybe the factory has a special request for them them to be longer?

It absolutely is true!
A different result from one airplane to another is likely related to how and where the wires are routed in other portions of the fuselage.
 
There are some subtle variations. For example, the placement of the blue tie wrap which shows where the harness is level with the subpanel cutout may or may not exist (not all the blue tie wraps in the instructions actually exist). When I made my comment, I was mostly looking at the GPS antenna.

Also in the images linked, some of the wiring is tied off in the firewall forward area where the instructions have it bunched and tied off in the subpanel. So, yeah, routing make a difference. So does doing things slightly different than the instructions portray.

But settle down, fellas, it's not that big of a deal.

BTW, the images helped a lot. They made me go back and doublecheck instructions and I found I didn't put the double Adel clamp on the throttle cable.

Two hours of work for that baby.

Now if I can just figure out where those plastic sleeves are from.
 
Last edited:
Interesting things I noticed:
  1. Pitot tube routing - The pitot tube routing is slightly different from the instructions. I like this routing a little better. If anyone copies, be sure to note the RTV to prevent chaffing.
  2. Overflow hose (FF-01220-1) routing - The instructions call to run this hose "around the right side of the Airbox". I initially tried to follow these instructions and ran this hose over the cooling hose and ignition wires, before dropping down under the engine mount. I thought there was no way this was right and immediately changed it. I believe the proper routing is under the right side of the airbox. As shown in these pictures.
  3. The overflow tube for the overflow bottle (FF-00094) routing - The instructions show running this from the cap to the left of the bottle, and then under and around. The pictures show a more direct routing to the right. Mine currently matches the instructions, but I will take a closer look at this.
  4. Tubing on throttle cable - The way the throttle cable has to be routed, it comes into contact with the engine mount. Placing tubing around the cable in this area seems like a good idea. I took an extra piece of the pitot tube, slit it, slipped it over the cable and secured it with zip ties on the ends of the tubing. I'll probably apply some RTV as well.
  5. Safety wire through two of the exhaust springs - I'm guessing this is to contain things if one of the springs break?
  6. No RTV on exhaust spring hooks - The instructions say to "Place a small amount of RTV over the spring ends". That doesn't appear to be in place in these pictures.
  7. Plastic replacement for adel clamps - These look like they would be much easier to work with than adel clamps. If I make changes in the future, I'll look into switching to these clamps.
  8. General wire routing - I've got the wiring ran, but not cleaned up and zip tied yet. These pictures give me a good idea of what it should look like.
  9. Color preference - This one is completely personal, but I do like the red engine coloring of the limited edition better than the green.
 
Interesting things I noticed:

[*]No RTV on exhaust spring hooks - The instructions say to "Place a small amount of RTV over the spring ends". That doesn't appear to be in place in these pictures.

There is when the airplanes are delivered new. The photos were taken during maintenance. Maybe the springs had just been replaced ( they look new).
 
Try this: https://kirkhill.com/NMC/NMC-Ref-Html/NMC-Product-ref-guide.html

No idea of where to buy them retail, but I see batches for sale on ebay.

Google "NMC CA2030" or "NMC CA1001" or "M23190/1"

It looks like Kirkhill makes a lot of stuff for Boeing. I think the conformance specs they reference (e.g. BACM14L) are Boeing specs.

There is a company called Boeing Distribution Services that apparently stocks and sells a lot of this stuff. They say they "stock over 1 million part numbers for OEMs, MROs and airlines." You can't get a price without first having an account.

The Kirkhill stuff looks great. I'd love to have some of the wiring stuff they make but I am scared to ask the price!
 
For Airbus stuff, I use Air Cost Control. Good folks and fair prices. Not sure if they also support Boeing parts.
For instance, I used EN2714_013 lightweight shielded cable for all the CANbus wiring on my 8 and sourced it from ACC. Encountered EN2714_013 on an Airbus program and really like it. Spiral shield (not as "good" as braid) is SO much easier to work with than M27500, and the cable is smaller. Worked great.

I think I did have ACC quote me some of the ABS1339 clamps and, ehhm, took the traditional Adel path....
 
Back
Top