What's new
Van's Air Force

Don't miss anything! Register now for full access to the definitive RV support community.

Rookie problem Pneumatic Squeezer mushing rivets

ijustwannafly

Well Known Member
I apologize if this is not posted in the correct place. As the title indicates im having some issues with my squeezer or possibly operator error??

I have the Isham tool kit and im just practicing away over here with various things as I start my 7 emp kit

Originally I thought the bucking was going to be the hard part. Turns out it is the only thing I can do with out messing things up.

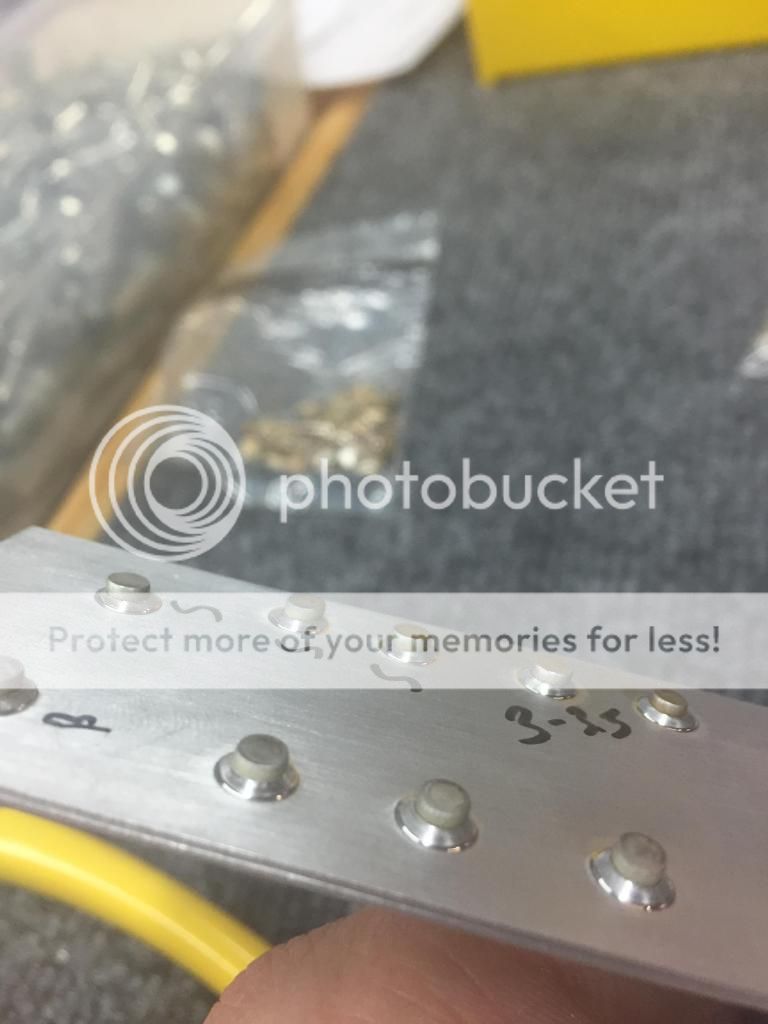
It seems my Pneumatic Squeezer is mushing rivets to the side or "cleating" them

At first I thought my adjustable set holder was bent. I ordered a new one and got the same mushed over results as my originally adjustable set holder. I tried the non adjustable version with shims and that still mushed shop heads over.
I have since tried different yokes, double checked material thickness and so on.
Originally I was practicing with two pieces of .020 and a 3-3
Someone told me that it was hard to get things right on that thin of material. Today I made a small practice piece with two sheets of .032 and did the math and came up with a 3-3.5 which seemed logical.

The results were pretty bad. I can buck rivets better then what I got out of my squeezer today. Does anyone have any suggestions on what im doing wrong?
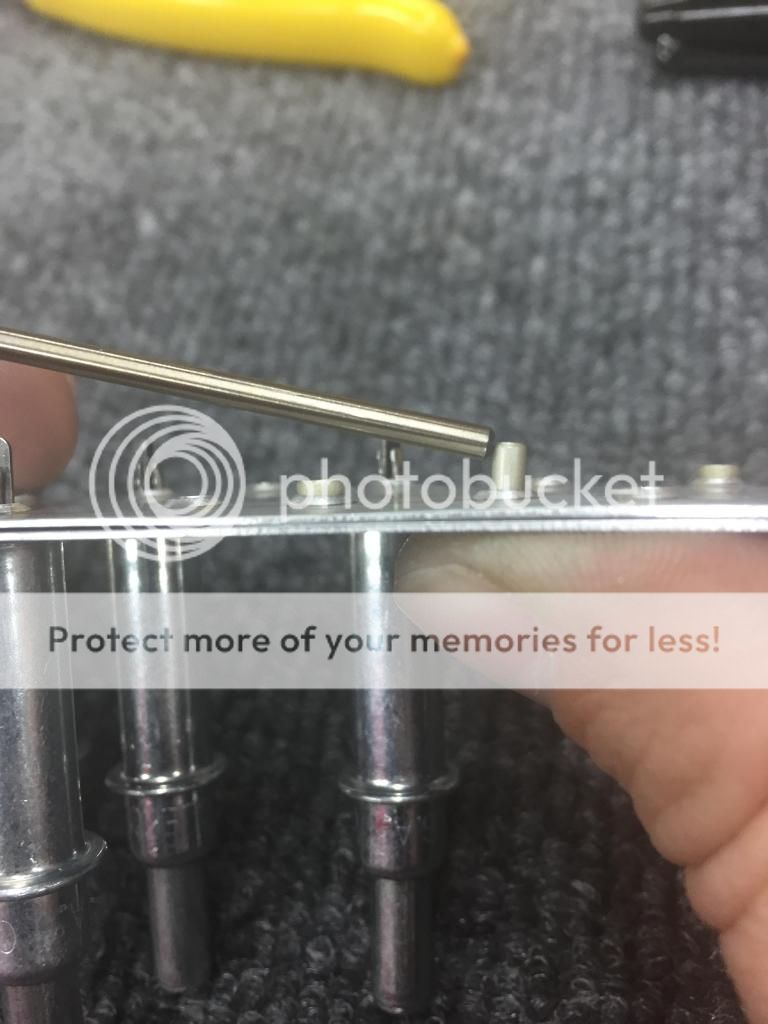
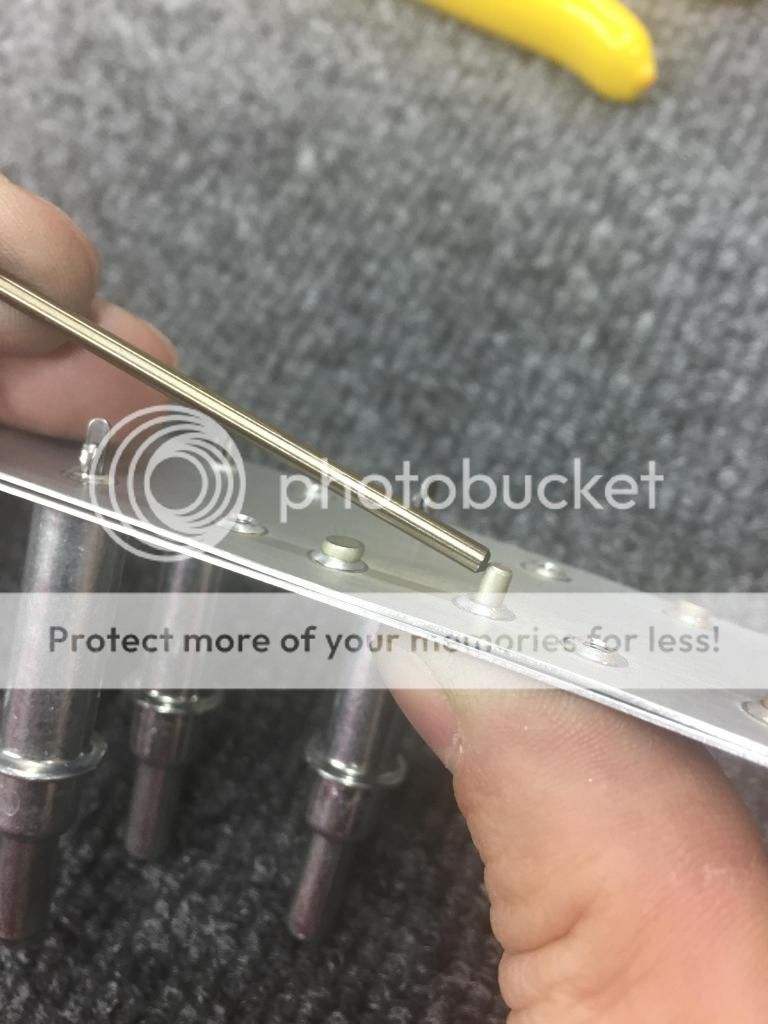
You will also notice there is two pictures with me pushing on the rivet with a drill bit. I wanted to show in the pictures how much play there is in the hole after it is dimpled. Does this look normal? It had a good bit of movement in there. I of course double checked the correct bits and dies were used. Also just a side note, pay no attention to the really short rivet in one of the pictures. It was a length experiment

IMG_2211_zps0eedc4ac.jpg


IMG_2209_zpsa9ebe45c.jpg


IMG_2201_zpsc93de02b.jpg


IMG_2200_zps53e2cf9d.jpg
 
Last edited:
What I have found to work best for me is to make sure the fixed set is on the head of the rivet, and the moving set is on the tail.

I hold the body of the tool so as to apply pressure on the rivet head, keeping the head in place in the dimple, prior to squeezing the rivet. This also helps me to keep the tool normal to the alum sheet.

If you have too deep a dimple or countersink, and the rivet head is lower than the surface, it is gonna wobble no matter how much you hold the fixed set against the work.

I do this with either the manual squeezer or the pneumatic one, no difference.
 
I have checked my pneumatic squeezer as well. I take a rivet, sit the factory head on the ram die. Then slowly advance the ram to begin to squeeze it. You can watch it with magnifiers if needed to see the detail of the process. If it is square, then you need practice. It is very easy to misalign the heavy squeezer. I have to take care to center both sides to ensure a squarely set shop head.

If the rivet only process fails to produce a concentric rivet. Then you need to investigate the sets for profile. Just methodically chase down the possible causes.

Good luck, and congratulations on recognizing a need to improve.

Having said all this, a 4" reach, no hole yoke WILL deflect and open some yielding a slight angle on the shop head along it's (yoke) major axis.
 
Check rivet length. It looks like you might have too long of a rivet in your first pic and rivets that are too long will almost always cleat. Related, don't automatically trust Van's drawings regarding rivet size. From my experience, sometimes a longer or shorter rivet is needed than what is shown in the call outs. Finally, a $12.00 rivet cutter also comes in handy for when the right size is between sizes.

Good luck, and hang in there. You'll get it figured out.
 
Squeezing rivets

What I have found to work best for me is to make sure the fixed set is on the head of the rivet, and the moving set is on the tail.

I hold the body of the tool so as to apply pressure on the rivet head, keeping the head in place in the dimple, prior to squeezing the rivet. This also helps me to keep the tool normal to the alum sheet.

If you have too deep a dimple or countersink, and the rivet head is lower than the surface, it is gonna wobble no matter how much you hold the fixed set against the work.

I do this with either the manual squeezer or the pneumatic one, no difference.

+1 What Mike said.
You're over thinking. The rivet normally has some slack in the dimpled hole. There's not much you can do short of using a bit one size smaller to match drill like #41 but any smaller and the dimple die won't go in the hole. The dimple stretches the hole. A #40 reamer will help as the hole is perfectly round and the exact size. The rivets look like the set is slightly off perpendicular when it hits. Assuming the set is perpendicular, it could be the rivet moving at impact. Try feathering the trigger so it goes up slowly and barely touches first then squeeze. I wouldn't call them clinched. A little maybe but I'll bet if you used a close up like that on every RV there would be quite a few similar. Build on Robert.
 
Bobby, dont feel bad, valid question...most of us have been there. I remember posting in my blog early on that I was amazed that I could screw up a rivet with a pneumatic squeezer...it should be automatic, shouldnt it? Well its not, I had the same issue as you...it was just a matter of not getting the tool normal to the work, and keeping it there throughout the stroke. Just practice...you'll get it. Also, as was mentioned...the "play" in the hole is perfectly normal...the rivet will fill the hole when set, by design. Lastly, those rivets dont look that bad...and certainly structurally sound IMHO.

Are you having fun yet?! We should set up a time for me to visit your project. Remember, learning is half the fun...and this path of discovery will continue all the way until first flight.
 
Possibly an oversized hole??

Apparently you seem to have this issues no matter the tool you're using right?
If so, let's have a look at a possible cause that could have a common point; the hole size. You need to be very careful with this.

You may have drilled out the correct size to begin with but things could turn bad when you deburr the hole prior to dimpling. It is very easy to "oversize" the hole in thin aluminum sheet (0.025 to 0.016). Once the hole is dimpled, you end up with an oversize hole, guaranteed. This in turn will make the rivet look as it is too long and you'll end up with a cleated rivet.

Just try a few more but this time with very little deburring force or simply try on a thicker piece and check the difference.
 
Take control

Here are a couple of tips to get you using your pneumatic squeezer like a pro.


1. Take full control of the squeezer. Hold it firmly with 2 hands. Many builders think that because the pneumatic squeezer does all the work, they can flick the trigger and let it do its thing....wrong!. You need to hold the squeezer firmly and take control of it. This is particularly important if your rivet is a bit on the long side. If the squeezer wants to roll over and clinch the tail of the rivet....just don't let it do it!

2. Practice using the squeezer in two operations rather than one. Practice teasing the trigger so that you can close both sets (head and tail sets) onto the rivet without actually squeezing it (you're just letting air escape from the cylinder as you do this). Then you can truly feel that you have perfect alignment between the tool sets and the rivet head and tail before you fully activate the trigger and squeeze the rivet. Once again it's a matter of taking control of the squeezer....getting it to do what YOU want it to do...not what IT wants to do.

Honestly the biggest problem I see that builders have with their pneumatic squeezers stems simply from the fact that they just don't have the tool under full control. They hold the squeezer limply, put one set on the rivet, flick the trigger...and just go bang.

In reality, taking control of the squeezer is much more important than whether you put the fixed set or the moving set on the head of the rivet. At any rate you need to be proficient at doing it both ways because in many cases access will be limited by the bulk of the squeezer body.
 
I noticed during my build that a deep reach, or a no hole yoke is more likely to do that, due to reduced stiffness. I use a normal depth yoke whenever possible.
 
Keep on pluggin..

..per our phone call last night. Like Ron said, you'll get the hang of it. It's good that you are striving for perfection. In my opinion, that's the end of the spectrum one should start from, but don't let it bum you out.
 
Rivets

And get a copy of the guide on rivets. If you read it, you will find that in a lot of cases, you do more damage trying to drill out a "bad" rivet. Most of the common minor errors, according to to guide, are still within 5% of full strength...
 
My best tip for riveting: Heavy-duty clear packing tape

Go down to your local Wal-mart, Staples, Office Depot and get some 3M Heavy Duty Clear Packing tape.

Use a small piece of the packing tape to hold the rivets in place for both squeezing and bucking. It helps immensely to have this third hand keep the rivets from sliding and shifting as you set them. The packing tape will also prevent the rivet sets from imparting any scratches or scuffing to your aluminum surfaces. This stuff is so much easier to use than the specialty riveting tape, which is too narrow and doesn't have as good of adhesion.

Tear off a piece of tape about 3" long. Fold over one edge about 1/4" to give you a handle to put the tape on and off the surfaces. A single piece will last for quite a long riveting session.
 
More Tools! Grunt grunt grunt!

;). I was having similar problems when using the pneumatic squeezer. I even punched a figure 8 into one of the holes for the bottom rib of the rudder...but I digress.

Personally I've found that having a foot operated trigger for the squeezer was money well spent. It allows me to hold the squeezer steady... It does take some practice feathering the foot trigger as well as the hand trigger. Always practice on scrap pieces until you are comfortable with how the rivets will turn out.

Finally, if doing a small piece, i put the squeezer yoke in a bench vice. The yoke is protected from scratches by masking tape or plastic vice jaw inserts. The squeezer is held solid while the small piece is very light, and can be manoeuvred easily to get it square to the rivet sets.

Happy building,

Steve W.
 
Bruce - With respect to your packing tape comment. I've been doing the same thing with Blue masking tape. Do you see any issue? My concern about using packing tape was the potential of the adhesive sticking to the aluminum skin after removal...

I'm a new and just want to make sure I'm not doing something stupid :)
 
As Steve M pointed out, your rivet is too long. As a rule of thumb, the correct rivet length is the workpiece thickness plus 1.5x rivet diameter.
 
Try a hand-squeezer first

My suggestion is that you borrow a hand-squeezer and first get some practice With riveting.

When you are satisfied With Your riveting skills, go back and use the pneaumatic sqeeezer again.
 
Buck 'em if you got 'em

See #9 above and when you make the actual squeeze, as stated before, make certain that the die is perpendicular to the skin, but also, squeeze the rivet VERY slowly a few times and see if that helps. We've all squeezed 1,000's of 3.5 rivets in 2 sheets of dimpled (Cleaveland Dies) 020, 025 and 032 material with success, so I question any problem with the hole size, unless you are over doing your deburring process. Your shop heads look good in general, but I see a few that ended up at an angle. Even if you bend them over a bit, the shop head should be parallel with the skin....unless you start at an angle.
 
Packing tape

Bruce - With respect to your packing tape comment. I've been doing the same thing with Blue masking tape. Do you see any issue? My concern about using packing tape was the potential of the adhesive sticking to the aluminum skin after removal...

I'm a new and just want to make sure I'm not doing something stupid :)

Not answering for Bruce but I've used that trick since I started. Works great.
I pull several pieces. I flip them over and draw a big "x" on the sticky side for a target then rub them on the wood top of the bench so they don't stick so much on the skin. I make several so I don't have to stop. When they get messed up, fold them in half and toss on the floor, grab another and go.

Sounds like a lot of work! I use the low-stick Scotch Magic-tape....just the right amount of hold, comes off with no residue, and cheap.
 
Thanks Larry! I pretty much do the same. Tear off 3-4 2x2 pieces, put 4 rivets in their dimples at decent separation, buck 'em, pull 4 clecos, drop in 4 more rivets, rinse & repeat.

Went from having the occasional mark on my aluminum to clean as a whistle :)

Glad to know I'm not doing something foolish! Thanks for the feedback!
 
Wow!
Although earlier when Larry alerted me that this made the home page and i felt rather stupid, it turns out this thread has been great and full of good ideas and suggestions. Hopefully it may help another NoooB in the future.

The low stick tape that paul recommended seems like a good idea.

For those people that indicated the rivet is to long, I'm not sure if you missed in my original post, i actually went as far as to do the actual math for the rivet length. For 2 sheets of .032 X 2 = .064 The shank on a 3 is 3/32 = .093 * 1.5
= .140
.140+.064 = .204

A 3-3.5 is 3.5/16 long = .218

As I'm sure many of you know this stuff already I just wanted to put up what i did incase i made a mistake. I was just following Vans Section 5 guide on rivet length.

By my calculation a 3.5 is the closest rivet length available. So when you say it is to long, do you mean i should use rivet cutter and actually shorten it to precisely .204?

A few other things i have tried.
Just to make sure i was not over deburring, i simply choose to forgo deburring a few holes to examine the difference in the rivet produced.

I also switched to drilling practice holes with my drill press set on a 3600 RPM speed to insure i was drilling perpendicular and not accidentally enlarging holes by being off 90. This seemed extreme to me as i feel i am somewhat confident in drilling a proper hole but i wanted to try this anyway.

Im using all nice shiny new bits and some boelube.

As i have learned in the last 12 hours from a few local builders, it seems that holding the set very tight against the factory head to keep the rivet aligned in the dimple helps a lot. I squeezed a few last night that are actually probably flyable.
I do apologize, my original reason for posting was because i thought using the squeezer required literally no skill at all and from my results i thought i may have had a tool that was in need of repair. Now that i am learning there is actually a technique to it and how you operate it actually matters i have been making some progress today. So my original foolish sentiment was that its a pull the trigger and go kinda thing! Apparently not! Lesson learned!
I will give the low stick tape paul mentioned a go. That seems logical.
Thanks again to everyone for all the great suggestions. Without VAF and my Local Denver team (Ron,Larry,Mike, Dave Paul, Sean B and Sean T) I'm not sure i would have as much hair still on my head as i learn all there is to learn about tooling in the early stages of my project. :D
 
Last edited:
Hmmmmmmmmm didn't I say that in post 2??

Ah Mike i stand corrected sir!
You did in fact say that in post two!

So what i should of said was

As i have learned in the last 12 hours from a few local builders and Mike on VAF :D, it seems that holding the set very tight against the factory head to keep the rivet aligned in the dimple helps a lot.
 
Thanks Robert:D:D

Seriously, riveting is something that takes practice, and then when you think you have it all figured out, BAM----now I gotta do this laying on my back or standing on my head or ???

We have all been there, remember the "this is part of the education" factor of homebuilding.
 
For those people that indicated the rivet is to long, I'm not sure if you missed in my original post, i actually went as far as to do the actual math for the rivet length. For 2 sheets of .032 X 2 = .064 The shank on a 3 is 3/32 = .093 * 1.5
= .140
.140+.064 = .204

A 3-3.5 is 3.5/16 long = .218

As I'm sure many of you know this stuff already I just wanted to put up what i did incase i made a mistake. I was just following Vans Section 5 guide on rivet length.

By my calculation a 3.5 is the closest rivet length available. So when you say it is to long, do you mean i should use rivet cutter and actually shorten it to precisely .204?


Yikes - suggest putting away the micrometer...:eek:

I agree with other's comments regarding control of the squeezer, rivet gun etc. I also think the rivet in the picture "looks" a little long...

I did find that if the required rivet length was between two standard sizes, it was far better to go with the shorter length. If I really needed something longer sometimes just nipping the end of a longer rivet would keep it from clinching...

Since proper rivet cutters do not go short enough for some rivets, I used a good pair of flush cutting side cutters for the shorter ones.

After you've driven a few thousand, and drilled out a few hundred, you'll get a feel for it... The call outs on the plans are often incorrect...

Above all have fun...
 
Wow, I've never gone to such lengths (no pun intended) to verify a rivet length :rolleyes:.

If I may......put the slide rule down and just use your eyeballs and LOOK at what you are doing and SEE your results. Squeeze some long ones and squeeze some short ones and WATCH what happens. It won't take you more than a couple dozen rivets to figure it out.

You won't 'learn' how to rivet unless you practice.

May I strongly suggest that you put down your work and grab some more scrap and PRACTICE until you get it right. It's really not that difficult :confused:.

Good luck my friend, you can do it :)!

For those people that indicated the rivet is to long, I'm not sure if you missed in my original post, i actually went as far as to do the actual math for the rivet length. For 2 sheets of .032 X 2 = .064 The shank on a 3 is 3/32 = .093 * 1.5
= .140
.140+.064 = .204

A 3-3.5 is 3.5/16 long = .218

As I'm sure many of you know this stuff already I just wanted to put up what i did incase i made a mistake. I was just following Vans Section 5 guide on rivet length.

By my calculation a 3.5 is the closest rivet length available. So when you say it is to long, do you mean i should use rivet cutter and actually shorten it to precisely .204?
 
Wow, I've never gone to such lengths (no pun intended) to verify a rivet length :rolleyes:.

If I may......put the slide rule down and just use your eyeballs and LOOK at what you are doing and SEE your results. Squeeze some long ones and squeeze some short ones and WATCH what happens. It won't take you more than a couple dozen rivets to figure it out.

You won't 'learn' how to rivet unless you practice.

May I strongly suggest that you put down your work and grab some more scrap and PRACTICE until you get it right. It's really not that difficult :confused:.

Good luck my friend, you can do it :)!

The only reason i mentioned the calculation is because several posts had indicated that my rivet was to long. Therefor in the defense of the rivet choice, i simply wanted to post the calculation. Thats all...
Also, incase i had made a mistake.

Thanks for your suggestions on trying long and short and seeing what happens.

If you notice in my original post I had said
Also just a side note, pay no attention to the really short rivet in one of the pictures. It was a length experiment
I had previously done just as you suggested. I tried some long ones, some short ones, some sheeeeemidum ones etc.

Also, as you suggested
"put down my work and practice"

I have not even attempted to actually rivet on an airplane part. All i have been doing is practicing.
You are correct about saying it is really
not that hard.
Your right its not. Which I'm sure is particularly easy for someone as yourself to say after building 30 airplanes as your signature indicates. I on the other hand have yet to set my first rivet in my kit which is why i called the thread "rookie" because that is exactly what i am. Which leads me to follow that up by saying i would assume there are about 100,000 things that you would say is "not that hard" that are not for you but will be for me.

As you will read in my second post, the reason for this post which may help others in the future thanks to my stupidity is the fact that i thought you could do no wrong with the squeezer initially.
i thought using the squeezer required literally no skill at all and from my results i thought i may have had a tool that was in need of repair.

That inaccurate assumption on my part lead me to think i initially may have had a tooling problem which is actually what spawned this post. :D

P.S Its impossible for me to put down the slide rule, calculator, engineering pad or matlab program! Im an engineer! I have slide rules on spring loaded devices that shoot from all pockets of my clothing on demand! Go Go Gadget Sliderule! :D
 
Last edited:
i thought using the squeezer required literally no skill at all and from my results i thought i may have had a tool that was in need of repair. Now that i am learning there is actually a technique to it and how you operate it actually matters i have been making some progress today. So my original foolish sentiment was that its a pull the trigger and go kinda thing! Apparently not! Lesson learned!

Probably kicking a dead horse at this point, but I think this is the best thing you learned. I had the exact same thought initially - AND the exact same trouble squeezing a straight rivet. As others have said it will come. Just like any new activity, it takes a bit until your eyes, brain, and hands all work together to achieve a desired result. Soon you'll be able to eyeball things much easier (straight squeeze) and actually stop before things go south and adjust the squeezer.
 
Probably kicking a dead horse at this point, but I think this is the best thing you learned. I had the exact same thought initially - AND the exact same trouble squeezing a straight rivet. As others have said it will come. Just like any new activity, it takes a bit until your eyes, brain, and hands all work together to achieve a desired result. Soon you'll be able to eyeball things much easier (straight squeeze) and actually stop before things go south and adjust the squeezer.

Thanks for the vote of confidence jon! Glad to know I'm not the only one! With this post archived now hopefully it will help someone else someday. I had actually searched before posting and was not able to find anything related to this although i could of missed it
 
One thing that I do not believe has been mentioned yet-------the pneumatic squeezer develops its max force at the end of the travel.

If you have the sets spaced so you have a really short travel, you will not develop enough force------and the rivets will look like they are under squeezed, so you tighten up the sets and the rivets will have even less squeeze to the shop head. :confused:

I have found that I have the best luck by starting off just pulling the trigger without anything but air between the sets, then adjusting the distance to just under what the length of a set rivet should be. Fine tune on an actual rivet in some scrap.

Perfect Mike. you are correct it had not been mentioned. I had found that previously in an old post when i originally searched on the subject matter. Thanks for bringing it up tho to insure i knew.

so what i have been doing because i have the adjustable set holder is pulling the throttle and closing the gap until it reaches the tip of the yoke. Then i just simply back it off for the proper gap. This i would assume is allowing me to get to the end of the stroke. Let me know if i have that wrong.
 
so what i have been doing because i have the adjustable set holder is pulling the throttle and closing the gap until it reaches the tip of the yoke. Then i just simply back it off for the proper gap. This i would assume is allowing me to get to the end of the stroke. Let me know if i have that wrong.

That should work just fine, just remember there is always going to be a slight spring to the squeezer/yoke assembly, so you may need to tighten things up just a smidge.

Also, I would back it off more than is needed, then run it back up----that way you take up slack in the threads. Old machinist trick.
 
For those people that indicated the rivet is to long, I'm not sure if you missed in my original post, i actually went as far as to do the actual math for the rivet length. For 2 sheets of .032 X 2 = .064 The shank on a 3 is 3/32 = .093 * 1.5
= .140
.140+.064 = .204

A 3-3.5 is 3.5/16 long = .218

As I'm sure many of you know this stuff already I just wanted to put up what i did incase i made a mistake. I was just following Vans Section 5 guide on rivet length.

By my calculation a 3.5 is the closest rivet length available. So when you say it is to long, do you mean i should use rivet cutter and actually shorten it to precisely .204?


Yikes - suggest putting away the micrometer...:eek:

I agree with other's comments regarding control of the squeezer, rivet gun etc. I also think the rivet in the picture "looks" a little long...

I did find that if the required rivet length was between two standard sizes, it was far better to go with the shorter length. If I really needed something longer sometimes just nipping the end of a longer rivet would keep it from clinching...

Since proper rivet cutters do not go short enough for some rivets, I used a good pair of flush cutting side cutters for the shorter ones.

After you've driven a few thousand, and drilled out a few hundred, you'll get a feel for it... The call outs on the plans are often incorrect...

Above all have fun...

Ron thanks for the great reply.

Fun is definitely being had! I love to learn and this is a whole new ball game for me. Thanks for the warning on the rivet call out. That is semi scary at this point in my head. Hopefully i won't make a mistake that causes an unsafe condition.
 
Robert,

Two things. First, I'm glad you got the adjustable holder. I added it to my squeezer and it's been wonderful. Second thing is I am a "buyer" not a "builder" and as such, have only random experience with most builder skills including squeezing rivets.

You're making good progress and asking great questions. Keep it up and you're going to have a solid safe airplane!

As one VAFer puts it, it's a lot of little tasks. Keep pounding (or squeezing) those rivets!
 
Get a rivet guage.

Ron thanks for the great reply.

Fun is definitely being had! I love to learn and this is a whole new ball game for me. Thanks for the warning on the rivet call out. That is semi scary at this point in my head. Hopefully i won't make a mistake that causes an unsafe condition.

Rob, you're on your way to building a great plane. Don't worry about all the calculations on rivet lengths. Buy one of these immediately. They cost stuff-all and if you have one you can never go wrong with the rivet length:

http://www.averytools.com/prodinfo.asp?number=1008

And while you're at it get one of these too so that you can instantly check a squeezed tail to see that it's within spec:

http://www.averytools.com/prodinfo.asp?number=1007

These things are so cheap and so foolproof you shouldn't be without them.
 
Back
Top