What's new
Van's Air Force

Don't miss anything! Register now for full access to the definitive RV support community.

RV-4 N45KM Matt Rhinehart

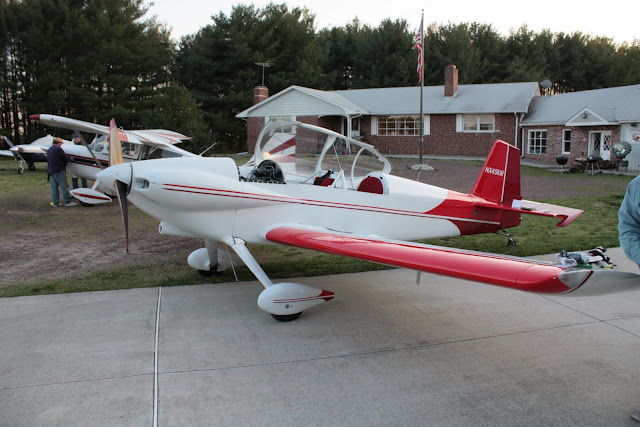
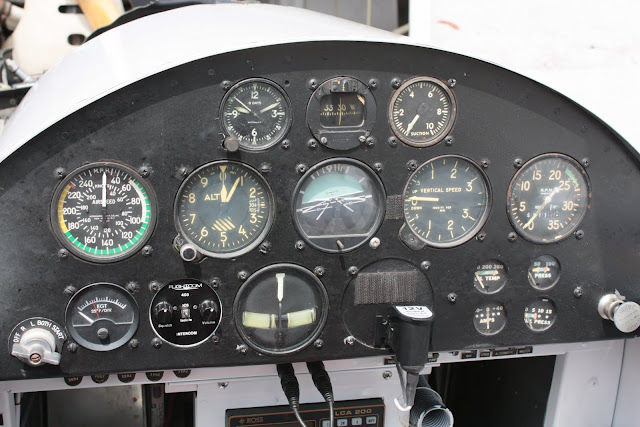
Finally the culmination of all my childhood dreams has arrived. I took the plunge and bought an airplane. I did take the easy way out and bought an already flying RV-4. This particular bird was finished in 91' and sold soon after to a guy who didn't fly it much over the next 20 years. It was purchased last year by Joe Flood who freshened it up and flew it a bit. All of this light use means TTAF is ~170hrs. The engine is an 0-320 (either an E2A or an E2C I can't remember of the top of my head) out of a Cherokee 140 with 170hrs STOH and ~460hrs SMOH. I have not been able to identify the prop though I know it turns about 2850rpm at WOT and it has a thick resin leading edge. The 91' vintage is evidenced by the pristine example of a Ross Loran-C still in the console (does anyone want a Loran-C for a great price?). It is fairly light weight at 934 lbs empty. Please check out the link to the additional pictures and let me know if you see any glaring deficiencies (or just good mods) that I should make when I get her back to her new home base. The first thing on the list it to repair or replace that cut off roll bar!

http://picasaweb.google.com/LotusSeven/RV4NX45KM

IMG_5901.JPG


IMG_5947.JPG
 
Having owned and raced a number of Lotus cars, some being 7's, I know how much fun you are about to have. :)
 
Congrats Matt

You're gonna love it. Order yourself a pile of adel clamps and start replacing most of the zip-ties FWF.

As far as mods, the rear seat footwells make it much more comfortable for the passenger. Also, since carelessly blowing my lid, I've become a big advocate of installing a "canopy latch" warning light. Yeah, I didn't think it was something I would ever do either. ;)
 
Not so very long ago back in undergrad my dad wouldn't let me buy a project car. So I bought some metal and a welder and starting building one from scratch on the back deck. When it came time to put the engine in he relented and let me move the project to the garage as I would have had to dismantle the deck to get it off if he waited any longer! My "Lotus Seven" is actually a Locost scratchbuilt replica of a Lotus Seven as originally designed by Ron Champion. The main difference between my project and most other Locosts is that I widened the chassis 4" and shoehorned in a Ford 302 small block. The project was "certified" for road use in 07' but I have been in the phase I, so-to-speak, on it ever since. Check the link for some slightly out dated pics. It now has a homemade carbon hood and some other finishing bits.

http://picasaweb.google.com/caldwell.kate/MattSLotus
 
Roger that, roll bar, adel clamps, canopy eject warning light, stick to hit the passenger with if they complain about the lack of footwells.
 
It looks like the baffle seal on the left aft section of the baffle and above the oil cooler is bent back the wrong way - aft instead of forward. Maybe just the picture, but these pieces of baffle seal should go forward to seal properly. As a mod, I would get rid of that coffee can sized beacon light on the belly and get something like a strobe unit (LED) on the wingtips.

Nice looking RV-4. You're going to love it.
 
Hard to see the prop in the pics, but it looks like a warnke toothpick prop. My dad has a 1991 rv4 with the toothpick prop. The warnke props have so many laminations that's it's very hard to count.
 
You're gonna love it. Order yourself a pile of adel clamps and start replacing most of the zip-ties FWF.

+1. All those zip ties, as far as you know, are 1991 vintage. They're old and brittle, which makes them prone to breaking. Adel clamps is the right answer.
 
roll bar

Could you not insert a new roll bar of the proper OD into what you already have? Maybe get you going quicker.
Blessings
Tharpo
 
Could you not insert a new roll bar of the proper OD into what you already have? Maybe get you going quicker.
Blessings
Tharpo
In race cars it is not unusual to insert a "bung" into the old tubing and end up with the same size tubing for the new piece, which fits over the bung.
 
Hoses

If your fuel, oil, and brake fluid hoses are original, I would replace them. Age code is on the bands on the fuel and oil lines. If you don't want to replace them again until engine overhaul, use Teflon this time. http://www.sacskyranch.com/h_life.htm

If you are going to redo the panel as a project next winter, consider going with the latest and the greatest from Advanced Flight Systems. http://www.advanced-flight-systems.com/

Replace those screen door springs with a set of Taillynx. http://www.vansaircraft.com/cgi-bin/catalog.cgi?ident=1163652032-132-9&browse=misc&product=tail-lynx


You made the right choice in aircraft.

Rion
 
All good info guys. I will add this stuff to the list. I know that zip-ties are a no-no but I had not thought about the fact that those are probably 20 years old now, good point there.

I will consider my options on the roll bar. Someone already contacted me saying he had an extra one lying around. I may take the current one and make up a nice curvy topped bar (w/bung splices) when I get around to sourcing 4130 mandrel bent tube. I just don't like the idea of using the prebent mild steel exhaust stock for a roll bar.

All of the oil lines and flexible fuel lines have been replaced in the past year. I think the brake lines may be original. Any way to tell if they are on their way out?

A complete panel redo is definitely on the list of want to's though the check book is still too hot to handle after buying the plane.

First things first though, gota source some transition training. Looks like I will be making a small vacation out of it based on who I have seen discussed here on VAF.
 
Prop notes

I got a used O-360 (180 hp) and had it overhauled for my RV-7A. It came with an Ed Sterba prop (can't tell what you have) with an 82 inch pitch. Straight and level with full throttle it turned 2825 RPM. I talked with Ed and he said it looked like I could use another 4 inches of pitch so I replaced it with one of his with 86" pitch. I still see about 2500 RPM on climbout but it improved my cruise by 15-20 knots. I fly out of a field at 4800 msl and didn't sacrifice much climb at all but now I cruise (@ 55% power) at 150 KTAS+ at just under 8gph. Something you may want to look into. (Just sayin')
 
Also......

AZ is pretty stable humidity wise, but as previously posted, I re-torque my prop every oil change-50 hours. If you're in a humid area, NW, NE or SE, you may want to do it more often. Also, be sure to check the tracking after the re-torque.
 
just curious why it is n numbered nx45km when the number is n45km?

The official N-number on file with the FAA will never show an X after the N. You are allowed to add the X on the plane if it is at least 30 years old or it is a replica of a plane at least 30 years old. At this point that makes it legal for an RV-4 to have the X. As for personal reasons, I dunno, it was on there when I bought it. I am pretty sure if you have the X shown then it takes the place of the word experimental though it seems like this should be a badge of honor.

Hawkeye, once I get a chance to do some flight tests to get better numbers on the prop I may spring for a new one. Sounds like it really helped your cruise numbers.
 
You have chosen...wisely

Matt,

Good choice on the 4, from personal experience of two grand sitting in one, you won't grow tired of it. All of the above inputs are good, here are some techniques that might help. I look at alot of 4's for people, here are a few things I look for:

1: Every oil change pull the cowling and check your prop torque as mentioned several times already. I had a Warnke for awhile and they are great props. Bernie used an early carbon fiber lamination on the back. Check it for separation, looks like a hairline crack at the white paint edge. Add lower firewall longerons for cracks, especially if it lacks heavy weldments. Many early 4's had tank slosh, if so check the drains by removing them every oil change long enough to drain the junk. Visually inspect inside the tank for loose slosh. Check the lower rudder and elevators if you have the .016 skins for hairline cracks around the rivets. While you're there, check the hinge attach nuts for tightness. Think about replacing brake lines if they are teflon, eventually they will leak. Email me off line, I can pass some gouge on all of the above.

2. Canopy lock lights aren't necessary if you actually make sure it's closed before you take off :) Nuff said.

3. Roll bar is a must but can be found fairly easily, I have one you can have, contact me off line.

4. Buy some good seats sometime in the future. The Oregon aero bottom cushion is nice for long flights. My personal record was Boise to Lakeland in one day.
5. Questions?

Congrats!
Smokey
 
Great Tips!

Smokey- Those are great tips! Like Matt, I'm a new -4 owner and would love to have an 'Oil Change / 50hr' checklist. Do you have anything like that (or care to make one with your knowledge)? :D I started to make one with the items you listed in your post. Let me know and maybe we can start a new thread on it.

Congrats Matt on your new purchase!!
 
The Big Five-O...

Matt/Robert,

I can't emphasize the importance of "taking a good look around" on an oil change on RV (or any) aircraft. In my banner-tow days I learned during frequent (weekly) oil changes and hard use how important it was. Here is my "once over" on an oil change.

1. Fly airplane! Woo Hoo, another good excuse to have fun. When you get back, remove cowling after it cools down a bit. Examine upper and lower cowling for anything "new" oil or exhaust stains, burns or even holes from alternator belts or FOD. Oil drips point to the source on the engine. Investigate if necessary. Remove spinner (on wood or composite props). I do it on C/S props if grease is present on the blades and inspect further.

2. Locate your drain bucket close to drain (so wind doesn't blow oil all over) and drain oil. Remove lower oil cooler line and allow oil to drain into bucket. Engage quick drain. Catch the first bit if you can for your oil sample if so inclined. Cut the safety wire on your filter and remove wire, bleeding fingers from puncture wound, optional. Loosen filter slightly with wrench, but not too much. Get a Glad Freezer Bag baggie for the filter. Slip it over the back and as far forward as you can get it forward. Remove filter. Glad bag catches most of the residual oil if not all. Your technique may vary :) Cut filter open and examine inside with magnet.
3. While oil is draining, get a small milk stool or upside down drywall bucket. Place near front of AC, sit down. With flashlight and 3/8, 7/16, 1/2", 9/16 open end wrenches close by, start at front of engine and check every nut and bolt and connection first with your fingers. If it has oil around it, see if it's tight, if not, tighten! Check the alt, alt belt and electrical wires going into it.
Check exhaust nuts and look for leakage (white residue) Wiggle exhaust pipes and look at suspension system. If it uses the semi-standard fuel line between tubing arrangement, look at the fuel line for splitting. Replace if it doubt. Inspect Van's FAB for cracks and security. Look down throat of FAB with flashlight (found a birds nest once) While there cycle the throttle, mixture and carb heat lines stop to stop. Look at the fuel lines and proximity to exhaust. See if anything has changed, is discolored or different. Give it a good looking over and don't be afraid to grab and check security of everything. Even taking your time you will finish the inspection before the oil drain subsides to a drip, drip, drip.

4. Prepare new filter with Champion silicone oil filter gasket lube (or end of finger wiped on gasket with engine oil) and install filter. The book says to tighten to spec with torque wrench. Personally, I use hand tight plus 1/4 turn. It's much easier to remove next time. Re-safety wire oil filter. Close quick drain or re-install drain nut. Install favorite oil. Don't forget Lycoming additive if so inclined. Re-Install dipstick/cap.

5. Get torque wrench. Remove safety wire on prop bolts. Inspect prop hub and blades carefully for cracks, deformation, gouges or damage. Torque prop bolts to manufacturers specs. Most of them it's 22-28 ft lbs with 7/16 bolts. Craig Catto's props are stouter and use 35. Use correct torque. Re-safety prop bolts and install spinner after checking it for cracks.

6. Test run for leaks, sans cowling. If OK, re-install cowling and go fly! Document in log book and reference tach time.


Questions?

Smokey
 
Last edited:
Great post Smokey!!

I have my first oil change coming up next month, and I have printed out your notes for that oil change.

Thanks,
 
2. Canopy lock lights aren't necessary if you actually make sure it's closed before you take off :) Nuff said.
True statement. Similarly, checklists aren't necessary if you actually make sure to do everything that you're supposed to do.:rolleyes:

Sarcasm aside, losing the canopy is at best a scary, humbling, and expensive mistake...or in the worst case, you die. Is a light necessary? Nope. Is it a good idea? Yep.

Just one guy's opinion. ;)
 
Sarcasm aside, losing the canopy is at best a scary, humbling, and expensive mistake...or in the worst case, you die. Is a light necessary? Nope. Is it a good idea?

Which manufacture(s) make the canopy latch and/or 'locked' light system?
 
canopy light

For anyone who is interested, I have designed a canopy light system for use in the -4. It is a very simple system, but efffective.

If anyone is interested, drop me an e-mail.:D
 
The book says to tighten to spec with torque wrench. Personally, I use hand tight plus 1/4 turn. It's much easier to remove next time. Re-safety wire oil filter..

If you don't understand "hand tight" then screw in till gasket contact.... then another 3/4 turn. That will be right at 16ft.lb. Never had a problem removing using just new engine oil on gasket.
 
Pro-Seal Fun!

Spent the better part of this past weekend working in a sweltering hangar but at least there is something to show for it. The right wing tank had been seeping fuel since I had bought it and recently it has been getting worse. So, armed with some polygone 300-AG polysulfide stripper, metal scrapers, and bare hands I had the inboard access panel off and stripped of the 20 year old proseal in about 6 hours. The polygone did dissolve the pro-seal but only in small layers at a time, things would have gone easier if I had applied, rinsed, applied, rinsed, etc over the span of several days but we needed to get it done over the weekend so patience was replaced with additional effort in scraping.
Since the last time I posted I sold half of the plane to a co-worker which has been nice to spread the costs out but it has an added benefit of guaranteeing a couple of extra hands when it comes to tricky tasks. He was replacing the zip-ties under the cowl with adel clamps while I was battling the pro-seal.
We resealed the tank with Flamemaster MC-236-B1/2 from Van's. The 3.5oz size in the mixing tube was just the right amount for sealing the panel and the rivet lines that were surrounding it and we finished just under the 30 minute gel time limit working quickly but methodically. We did a couple of dry runs to make sure we knew exactly what we were going to do in what order. The original builder had used gasket material under both the access panel and the fuel level sender. A couple of rivets on the body of the sender were preventing the flange from fitting flush against the panel face so this was corrected and hopefully that was the source of our leak. We replaced the gaskets with an ~1/8" thickness of the flamemaster sealant. It passed the first test of a full tank but we are waiting 24 hours to call it a victory.
 
The Snowball Effect

It's been about a year since I brought 45KM home and the flying has been great. We figured, since we had to take it down for annual it would be a great time to replace the old, half-working engine gauge 4-pack out of the donor Cherokee 140 with a EMS. We eventually settled on an MGL Xtreme. The snowballed into:
-A full PFD/EMS version of the Xtreme
-LED nav-strobes from Ztron
-An HID landing light
-The addition of a KX-125 (with a Bob Archer in the wing tip)
-Carb/Cabin heat from Robbins Wings.
-A full rewire featuring the solid state power distribution panel from Ztron
-Tons of other little goodies here and there

Gouge will be forthcoming on the Ztron kit and the MGL once we get it in the air. In the aerospace defense industry this is what we call "Scope Creep".

Now for the real fun. The exhaust residue on the #3 cylinder lead to the missing inner exhaust manifold nut which lead to the loose exhaust manifold stud which lead to the gaping hole in the exhaust port caused by someone trying to oversize the stud tap which lead to finding the crack running from the exhaust port face to the valve seat which lead to finding the crack in cylinder #2 which lead us to decide to replace all four cylinders since they are of the same vintage as the cherokee the engine came out of. Hey, at least we have no excuse not to upgrade the E2A to 160hp now!

So, the $64 question. Do we go with new Jugs/pistons from ECI, Superior, or Lycoming? They all offer nitrided/through hardened steel cylinders that fit the bill though a different price points.

In the following pictures the cracks have been hit with penetrating lube to show up better.
Cyl%2520%25233.JPG

Cyl%2520%25232.JPG

One vote for genuine Lycoming.
 
ZL-BP8

Could you post some pics of your ztron breaker install and thoughts on it?

Thanks.

I will have to follow up with pictures and a flight review but on initial inspection you can tell it is well thought out from an electronics POV but it may not be as ruggedized as I would like for aviation applications. It looks on the website as if it may have an anodized aluminum frame but the structure of the unit is actually a relatively thick PCB. The face is a printed plastic film that is glued(possibly) to the front of the PCB. The back is a thicker piece of plastic that free floats behind the PCB held in place by holes and slits cut for the spades and the mount bolts. The rear plastic is held off of the ICs by small rubber o-rings captured on the mount bolts. This means that the rear of the PCB is not protected in any way from dust or moisture, just the occsional light poke by a screwdriver. When bolted in place in the panel it seems sturdy enough to handle even the most gorrilla like button presses. The spades are the biggest question. They are attached directly to the PCB so the wires MUST be strain relieved behind the unit by some other means. Also, the spade connects don't provide any form of locking. I may drill a small hole and safety wire the connectors together to keep them from backing off. Other ideas welcome here.

Some additional information, the buttons work on capacitance (like an iPad) so they won't work when you are wearing gloves.
 
Last edited:
Any new news on your 4 ?

I was doing a little reading and was wondering why there were so many problems with the cylinders with such low hours on them. Also is there a log book record in reference to the repair that increased the hole size in turn cracked the cylinder ? May I ask what you paid for rv4 ?

Thanks
 
Last edited:
Back
Top