

TruTrak pitch servo installation in RV-7A -- old problem, new solution?
As others have noted on the forums, the TruTrak pitch servo installation in the RV-7A results in the push rod having a pretty substantial sideways angle. I'm told this is ok. But I'm also finding that even still, I'm having to add spacers between the push rod and the servo arm as well as the bell crank, to prevent the push rod from rubbing on the bell crank. I understand TruTrak recommends against adding spacers at the servo arm due to added stress on the servo. So...
I have another solution to propose, and I'd like to solicit some feedback, especially from TrutrakTech (Lucas?). My proposed solution is to connect the push rod on the opposite side (i.e. the left side) of the servo arm and the elevator bell crank. With no spacers on the servo side, and just one washer serving as a spacer on the bell crank side, the geometry actually works out very nicely, except that the push rod just barely rubs on the servo mounting bracket at the top of the flange where it's diagonally cut. (I'll venture a guess that this was actually the intent when the bracket was designed, but it just wasn't quite enough clearance.) I think I can make it work by trimming just a bit more from the mounting bracket, maybe 1/8 inch deeper, at that diagonal-cut area of the flange. I think that would provide ample clearance for the push rod, and shouldn't significantly affect the strength of the mounting bracket. Any thoughts?
Thanks,
-Roee
Proposed solution:
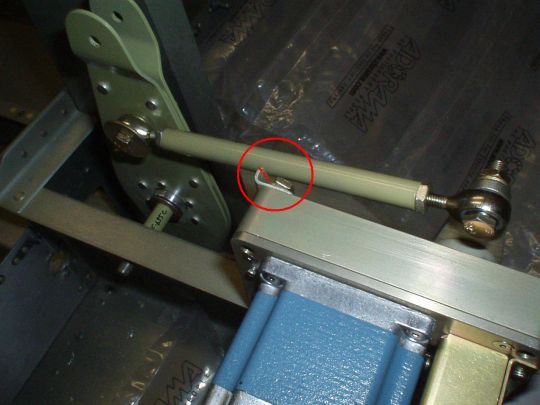
Last edited:
")

