

Kyle Boatright
Well Known Member
I've never really been happy with the landing light situation on my RV-6. The problem began when I only put a landing light in one wing. A light in each wing would have been much better, but once the airplane was finished (and painted), I couldn't bear to the thought of ruining the paint on that wing to install another light. So I tried a couple of different lighting solutions - both homebrewed and from the factory. In the end, I found that the lights that gave me long range visibility down the runway didn't have a wide enough light pattern to be effective taxi lights. And lights that worked well as taxi lights were not particularly good as landing lights.
So I came up with the idea of using two lights in one wing - a landing light side by side with a taxi light. The next step was to e-mail my friends at Duckworks to see if they had lamps that were appropriate. Their response was that, no, they didn't have appropriate lamps for a side by side installation, but they had toyed with the idea of an over and under installation using a mounting bracket which allowed a round taxi light located above a rectangular landing light.
I said sign me up and chose a 35W HID taxi light mounted above a 55W HID landing light.
And here's what they sent:
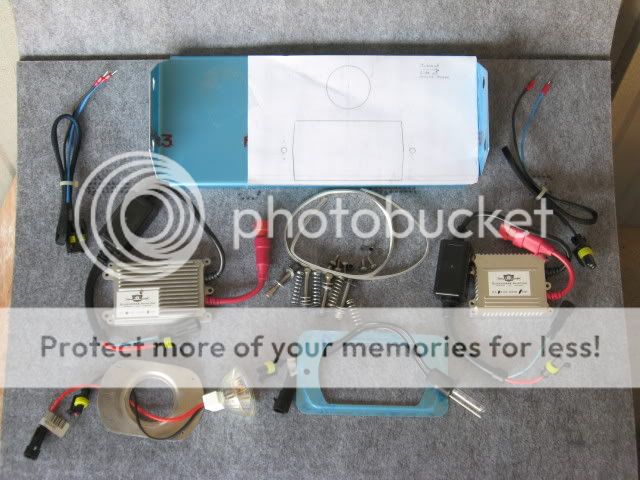
Essentially, a standard Duckworks mount, plus two lamps, ballasts, and a pattern for how to cut the mount to hold the lamps.
A few hours in the shop converted the pile 'o parts to this:
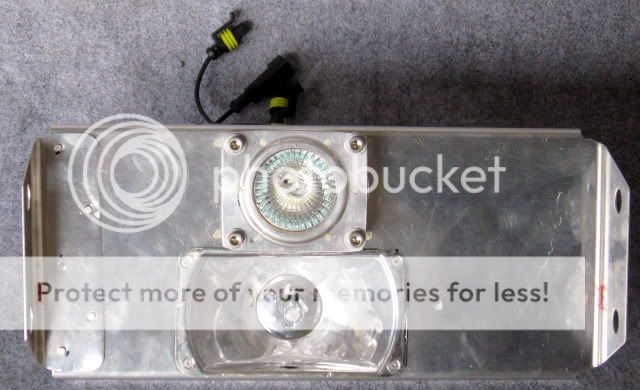
Which looked like this from the back:
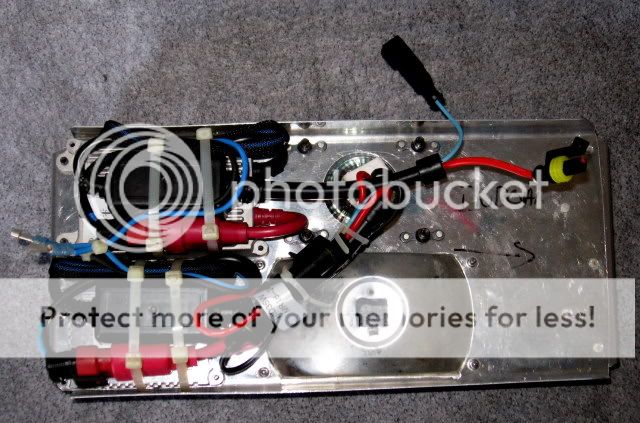
It was a tight fit installing the assembly through the lens opening, but it was doable. At first, I ran both lamps off of one 14 gauge wire, but later I used the 14 gauge wire to pull a pair of 16 gauge wires. The 14 gauge just didn't have the ability to supply the inrush current to reliably fire up both power supplies.
After the wiring change, the results are spectacular. Now I have the best of both worlds. A spotlight to illuminate the runway centerline from far away, and a floodlight to add depth perception in the flare and to provide taxi visibility.
I'm very, very pleased with this installation and recommend it for any of you who are not-quite-satisfied with your current light situation.
Right now, I've got the only one of these in the world. But if you called or e-mailed Duckworks ([email protected]) , they just might make one for you...
So I came up with the idea of using two lights in one wing - a landing light side by side with a taxi light. The next step was to e-mail my friends at Duckworks to see if they had lamps that were appropriate. Their response was that, no, they didn't have appropriate lamps for a side by side installation, but they had toyed with the idea of an over and under installation using a mounting bracket which allowed a round taxi light located above a rectangular landing light.
I said sign me up and chose a 35W HID taxi light mounted above a 55W HID landing light.
And here's what they sent:
Essentially, a standard Duckworks mount, plus two lamps, ballasts, and a pattern for how to cut the mount to hold the lamps.
A few hours in the shop converted the pile 'o parts to this:
Which looked like this from the back:
It was a tight fit installing the assembly through the lens opening, but it was doable. At first, I ran both lamps off of one 14 gauge wire, but later I used the 14 gauge wire to pull a pair of 16 gauge wires. The 14 gauge just didn't have the ability to supply the inrush current to reliably fire up both power supplies.
After the wiring change, the results are spectacular. Now I have the best of both worlds. A spotlight to illuminate the runway centerline from far away, and a floodlight to add depth perception in the flare and to provide taxi visibility.
I'm very, very pleased with this installation and recommend it for any of you who are not-quite-satisfied with your current light situation.
Right now, I've got the only one of these in the world. But if you called or e-mailed Duckworks ([email protected]) , they just might make one for you...
")

