What's new
Van's Air Force

Don't miss anything! Register now for full access to the definitive RV support community.

Painting techniques

DakotaHawk

Well Known Member
After doing a lot of research of various threads and websites, I've decided to paint my -7 before first flight. Without starting a flame war about the pros & cons of painting now vs. waiting until all the kinks are worked out, I do have a couple of questions.

rv6isoview2.jpg

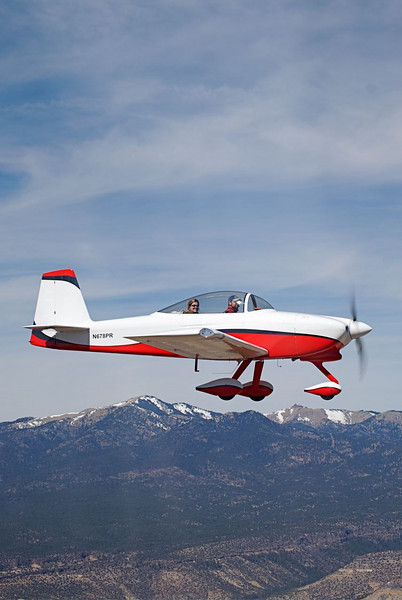
(no, the spinner will not be red - I just did that so I could see the difference between the spinner and the cowl!;), the wings will be identical, and the tail will also have similar swoops - I just didn't get that detailed with microsoft paint)

I've decided to use Stewart Systems AFS paint system. These guys are fairly local, which means that I can order today, and UPS delivers tomorrow! I also really like the waterborne process - don't have to worry about all of the protective clothing and breathing devices.

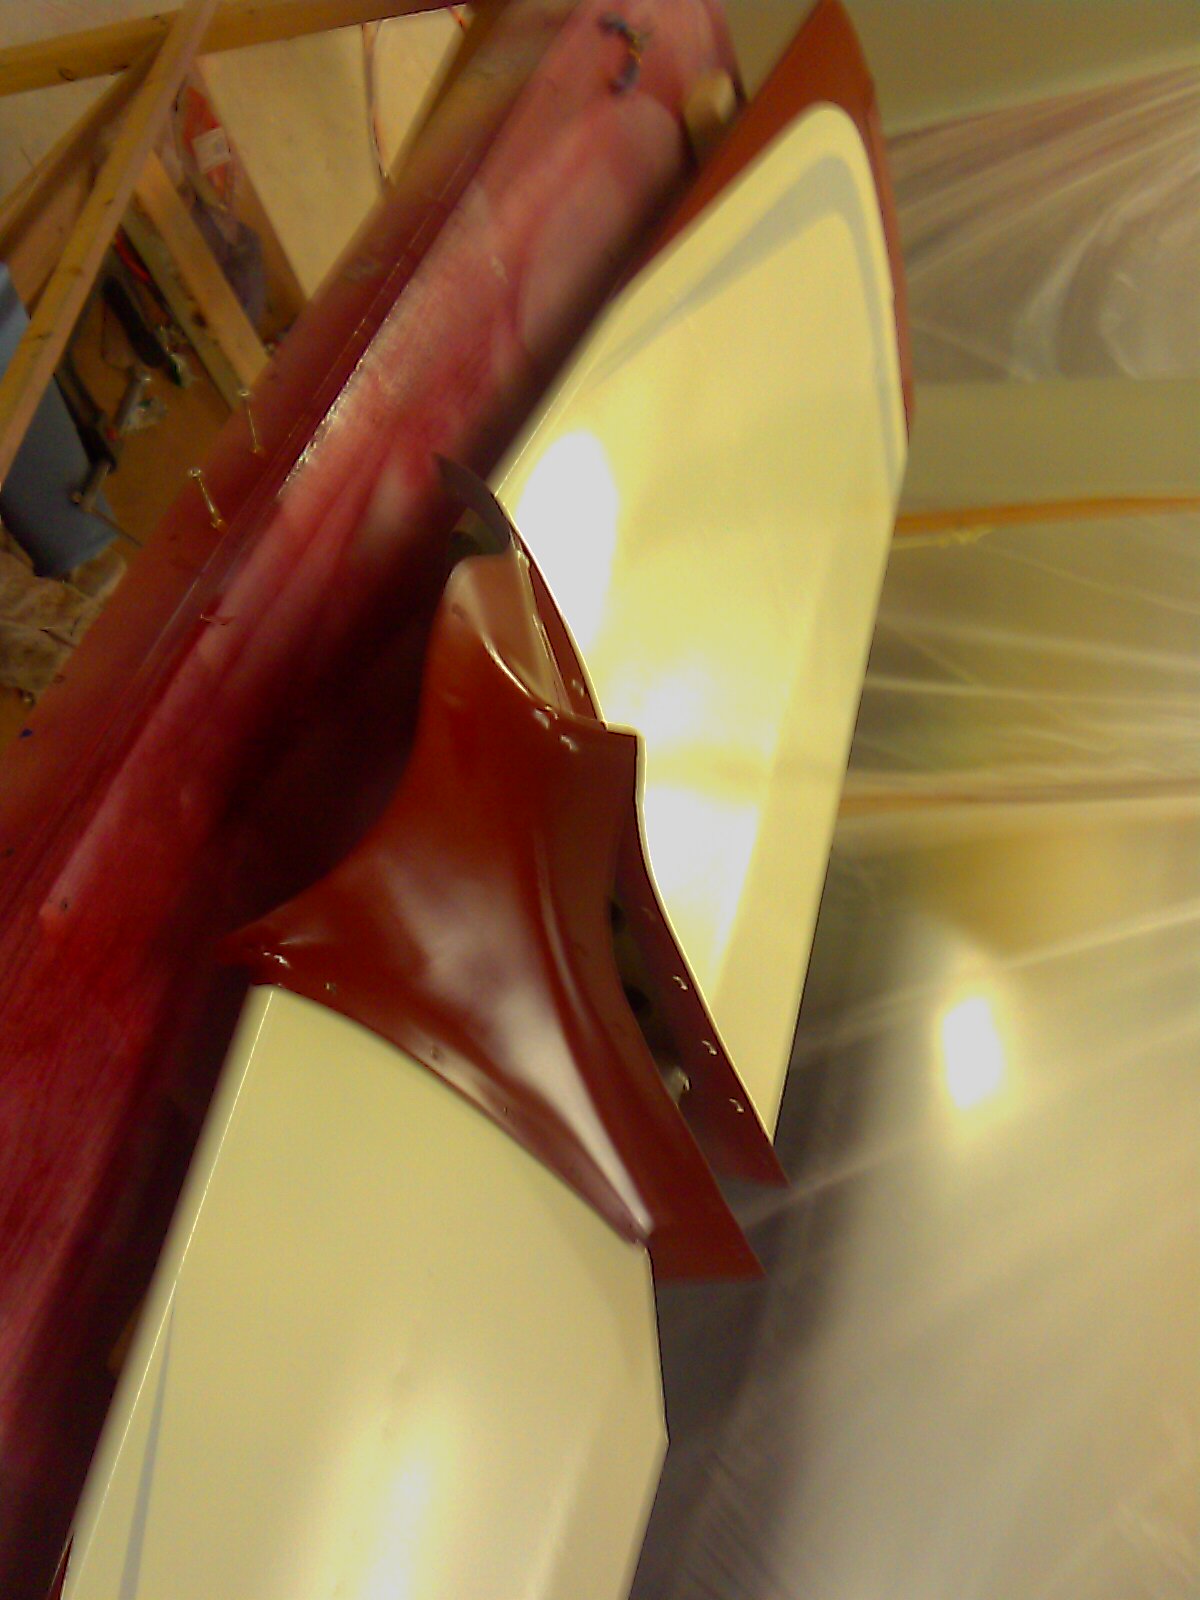
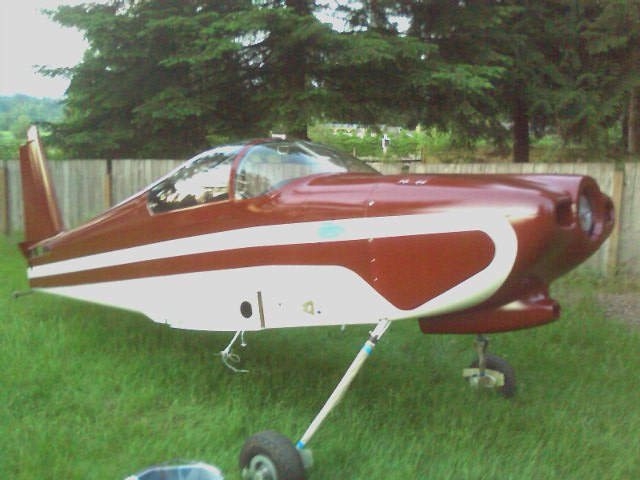
My first question is regarding masking curves. My paint scheme is fairly simple, but it does have some curves in it. Are there any tricks to getting a good sweeping curve that is duplicatable on opposite sides of plane? Do you use a template, or eyeball the curve as you tape it off? I've thought about going to a sign shop and getting a vinyl overlay cut-out to use as a paint screen.

My second question is regarding colors bleeding under tape. I've read various methods of preventing or minimizing bleed-under, such as spraying a base color over the mask line prior to spraying the trim color. What works best for you?

Thanks in advance for suggestions and hints!
 
Paint FWIW

I have painted a lot of airplanes,15 years in the business, and have little knowledge of the water base products presently on the market, however I would be reluctant to use them on a customers plane.

As for the masking of the curves. Applying curves with tape can be done with success depending to the individual's attentoin to detail. It is not easy to do an exact duplication on both sides, but it can be done. Remember, you cant see both sides at the same time, and little differences are hard to detect. Paint Masks, obtained from sign makers ,work great, are a little pricy, and some what difficult to apply, they will give an exact dupilcate on both sides if applied accurately.

As for "Bleeding under tape" the best results are obtained by "Attention to detail again" try to avoid rivits and seams when possible, imediately, prior to painting, do a final "Tape push" .That is go around the airplane and push the tape down again, using your fingers and or a plastic squeege. The tape tends to stick well when first applied, but slowly creeps up. It goes with out saying, use quality products, not masking tape for lines. You will get some bleed thru under the tape no matter how hard you try. Important to clean up as soon as possible after removing the tape.

My only coment in closing, I have seen "Outstanding" paint jobs done by amatures in garages, however, most amature attempts fall short. Depending on your expatations, a professional paint job is usually the best. Most builders spend a lot of time in the building, when it comes time to paint, they are usually, out of time, patience, money, and just want to fly. This is not the time to "Cheapen Up". The paint job is what people see first and makes the biggest impression. You can have an award winning build with a so so paint job and you have a so so plane. FWIW.
Dick
 
As for the tape bleeding, go to an automotive paint store and buy some 3M Blue Fine Line tape. Use it along the edges. You will get a very clean line and the tape is easily stretched for curving lines. It is a tad expensive but if you just use it along the lines, you can get by with one or two rolls. This tape is far superior to all kinds of masking tape.
 
Hi Scott....

When I worked in the paint department at Peterbilt trucks (in 1965), the patterns were made of thin brown paper and taped to the truck cabs. They had laid out the patterns with a pencil on the paper and then made pinholes using a dressmaker's wheel...lotsa little sharp points over the drawn lines. With the patterns in place, they "dusted" through the little holes with a blue chalk in a baggie of cheesecloth that's used in builders string to snap lines. We removed the paper patterns and the blue chalk stayed behind and we masked to those lines.

Regards,
 
Last edited:
RE: Great Paint Scheme

Scott

As you probably know by my "Paint Has Begun"

http://www.vansairforce.com/community/showthread.php?t=33556

thread I too am using the Stewart System. I can vouch for the previous threads and their varacity.

Other than the problem with the filter system and some initial growing pains with pin hole removel (not associated to the paint system) I have enjoyed the learning process and the outcome of the paint.

As always the Devil is in the details. As we all know trying to learn to fly by reading a book is near impossible. Practice...Practice...Pactice...with good equipment and good instruction.

Stewarts System has many virtues but be prepared to to be very precise in materials preparation for painting, paint preparation, paint application.

Good Luck and if you need any help in the way of a second third fourth opinion give me a call. 435-632-6895.................

Frank @ 1L8 ...RV7A...
 
I'll second the coment about using 3m fine line tape. I drew careful drawings of my paint lines and then kept them handy while masking. I laid out the lines on the first side by hand, using the fine line tape. Once I was satisfied, I put triangles of blue masking tape (outside of the area to be masked) at various points along the other side. The bottom points of the triangles were my marks to hit with the real masking tape. The two sides of my plane match quite closely, not that anyone can see them at the same time.

One key to laying out smooth curves is to always keep the hand holding the roll of tape as far away from the hand pushing down the tape as possible. If your hands are close together, a small jiggle with the tape hand makes a big jiggle in the tape line. If your hands are far apart, a small jiggle with the tape hand makes almost no jiggle in the tape line. Hard to explain--easy to demonstrate.

As for my experience level, I've only painted one airplane. I did spray a lot of clear laquer in my former career as a furniture maker though. Painting the plane was certainly the most difficult part of the project, but I'm really glad I did it. Locals, including employees of the local FBO have told me that my paint job is better than what the pros do at the FBO. You can absolutely do a good job-- you just need to be patient and beat down frustration from time to time.

Guy

483300742_CcPRT-L.jpg
 
For the symmetrical design...

...side-to-side, you could revert to a "low tech" approach. Find an overhead projector. Draw a side view of your ac with the paint lines (photo copy, freehand, whatever) and print that to a standard sheet of paper. Then take that paper and make a transparency of the drawing.

Now, place the transparency on the overhead projector (yes, turn it on) and move / position the projector so that it displays the lines on your ac. You can now mask to those projected lines. Moving the projector farther from the ac will cause the projected lines to become "fatter", but you will be close.

When finished with the first side, move the projector to the opposite side, and flip the transparency over. You can now mirror image the previous side...
 
This would be the engineer's method....

...side-to-side, you could revert to a "low tech" approach. Find an overhead projector. Draw a side view of your ac with the paint lines (photo copy, freehand, whatever) and print that to a standard sheet of paper. Then take that paper and make a transparency of the drawing.

Now, place the transparency on the overhead projector (yes, turn it on) and move / position the projector so that it displays the lines on your ac. You can now mask to those projected lines. Moving the projector farther from the ac will cause the projected lines to become "fatter", but you will be close.

When finished with the first side, move the projector to the opposite side, and flip the transparency over. You can now mirror image the previous side...

...however, when I talked about masking with the professional painter who did my Tiger, he had a different approach.

His technique is to stand slightly outboard of the trailing edge of the wing tip, and make all of the lines and curves look correct from that vantage point. This got some interesting lines at the forward base of the fin when you get in close, but it does look correct at the "step back for the big picture" level.

This is how the details will be evaluated by viewers on the ground. Perfect lines projected at 90 degrees to the surface might be correct in flight, but few folks will get to see it. Make it "right" for the folks viewing it on the ground...:)

PS I are an unjinear, so no offense was meant in the title...:D
 
Last edited:
Thanks for all of the input! It's getting exciting as I get closer to shooting color.

I've been using the red putty to fill all of the pinholes - probably have about 15 hours just in that endevour. I'm using the two-part red glazing compound as opposed to the single part. It kicks off in about 3 - 4 minutes, so I can only do about a 6" area per batch. The good thing is that I can almost immediately clean off the mixing board and make another batch to continue filling pinholes.

I've shot Stewart Systems Ekofill on about 90% of my fiberglass, and will finish shooting Ekofill on the rest of the 'glass tomorrow, including the canopy(fiberglass skirt) and windscreen. I'll let that cure for a day or two, and really look hard for any more pinholes before moving on to the base primer coat - probably start that this weekend, and then move on to color coats next week!

Guy - Your plane is beautiful! I understand what you're trying to say about holding your tape as far away from where you're sticking it down. Just like Reeves said about his son playing goaltender for the hockey team - when the goalie comes out to attack the puck, he's cutting down on the angle - you're talking about the same principle to minimize wavy/sudden jogs in the tape line.

Az-Gila - One of the things that I really thought carefully about was how the various "transition areas" would look with paint. I planned my paint job so that nothing "happens" in transition areas, such as the fuselage - empennage intersection, or the wing roots. All color changes and direction changes occur on flat surfaces so there is no distortion of the paint scheme depending on where the viewer is standing. Great suggestion regardless!

Gee! It sure is easy to paint a plane! :D
 
I have had good luck with using 3M vinyl electrical tape to mask curves. It will take a pretty good curve. I found that the FineLine lifted in the tight corners...
 
Question Scott

Are you painting with the tail and wings attached or seperately. I have an auto painter that I would like to have paint my plane but I would have to take the plane there in pieces. Just wondering if this is do able or if I will have to wait until all fairings are attached with screws installed.

Thanks
 
Paint in pieces

That means removing the faring covers etc.

Of course if you have a line that crosses a joint you'll have to put both parts in place, mask the line and then take them apart again.

Frank
7a self painted
 
Paint in pieces...

Nemo,

I got a lot of opinions about painting.
Some said "Paint it yourself", others said "Pay a professional".
Some said "Use PPG or DuPont or XYZ", others said use household Latex".
Some said "Waterborne paints will cause your airplane to rust", others said "Solvent based paints will cause your neighbor's dogs to quit barking".
And some said "Fly it and work out the kinks before you paint", and others said "Paint it before you get soot, exhaust, oil, bugs, etc all over it".

So I'm following half of the advice that I get!;)

I'm painting it myself, using Stewart Systems that may rust my aluminum airplane, and I'm painting it in pieces before I fly.

As FrankH said, I'll do all of the filling and primer in pieces, then temporarily attach anything that has lines crossing pieces so I can mask all lines as straight as possible, then disassemble to paint the masked pieces. I think that the only pieces that I'll have to attach for masking are the fuel tank to the wing, and possibly the ailerons to the wing. I haven't quite decided where the swoop on the wingtips will go.
 
Yes Gil...

...I am an engineer, or at least I was until last Thursday when my day job left for Taiwan. But not to worry...I just transitioned into retirement.:cool:

As my previous post would indicate, I showed my age by referring to an "overhead projector". The youngling engineers quickly pointed out that they would have used a video projector attached to their notebook computer to accomplish the same thing...and they would be able to change the projected colors with just a few keystrokes.
 
Congrats on the retirement...

...I am an engineer, or at least I was until last Thursday when my day job left for Taiwan. But not to worry...I just transitioned into retirement.:cool:

As my previous post would indicate, I showed my age by referring to an "overhead projector". The youngling engineers quickly pointed out that they would have used a video projector attached to their notebook computer to accomplish the same thing...and they would be able to change the projected colors with just a few keystrokes.

...when I initally mentioned it to the paint shop, I referenced a slide projector - bet your younglings don't know what that is either....:)
 
When I worked in the paint department at Peterbilt trucks (in 1965), the patterns were made of thin brown paper and taped to the truck cabs. They had laid out the patterns with a pencil on the paper and then made pinholes using a dressmaker's wheel...lotsa little sharp points over the drawn lines. With the patterns in place, they "dusted" through the little holes with a blue chalk in a baggie of cheesecloth that's used in builders string to snap lines. We removed the paper patterns and the blue chalk stayed behind and we masked to those lines.

Regards,

Eastwood's (the car restoration suppliers) sell the supplies for Pierre's method. They call it "pounce powder".
 
First pics of painted parts...

I've completed the paint on the horizontal stab, elevators, and some of the other small pieces. :D I'm about 95% satisfied with my efforts so far. The two things that I'm NOT satisfied with are 1) I got a little bleed under the 3M painters tape so my maroon bled a little into the cream color. 2) I spent a lot of time trying to figure out my paint gun, and had pretty poor results for a couple of weeks. Spent lots of time talking to Dan at Stewart Systems. After weeks of troubleshooting, he finally suggested that I purchase a Defilbriss Finish Line III HVLP 1.3mm tip($129 at the local auto paint store). Instant satisfaction:D!!! I got a very smooth finish first time.

So does anyone have any suggestion about fixing the bleeding maroon color?
121.jpg
Sorry about the fuzzy shot. My camera is packed away (going to disneyland tomorrow) so I had to use my cheap cell phone camera.
 
Maybe late but my.02

The easiest way I know of duplicating a pattern is the graphite method.

Tape up your pattern on one side of the plane, get it like you want it.

This is to be done in sections.

Tape paper over that.

Make a blank piece of paper with a lot of pencil lead on it.

Rub the paper with the pencil lead over the paper that is covering your plane and the underlying tape.

The Tape will show up from under the paper, the skin lines will show up, and maybe some rivet heads too.

You can transfer this by removing and taping it on the other side.

Lift up your pattern here and there and put tape where it is easy or little pieces of tape 6 inches apart that you can mark on to guide your final application of your fine line tape.

BE PATIENT,;) and press your tape down in stages so it does not wrinkle or shift.

I use the light green 3m fine line plastic tape. I start by laying down 1/2" wide, and then wider inside that if I need. I do not stick the standard or the blue crepe paper masking tape where it would define the actual paint line, for that I always use the plastic tape and pull it off in about 30 to 60 minutes afterward. You want to do that at an angle so as to get a clean break on the line and not disturb your new or old work. That will require your own personal technique, but I peal it back at about 135 degrees and slightly towards the masked area.

I spent 20 total hours Yesterday and the day before painting my left wing white and then a nice blue leading edge to almost a foot back.

It's dang hard work, but worth it.:cool:
 
Adventures in painting

1) Use a fresh batch of fine line tape. Because the surface & edges of fine line tape do not absorb paint, it won't bleed if adhesion is achieved. Paper tape is guaranteed to bleed. Use paper tape for painting the bedrooms but fine line is used for quality paint jobs where sharp edges are required such as show cars. If the final step before taping includes cleaning the surface with Prep Sol, the fine line tape will adhere much better, but never buy a roll of tape that's been sitting on someone's shelf for 5 years. The adhesive is probably dried out.

2) It took me 3 weeks to paint my 9 in my 2 car garage. My only regret was not painting the fuse while it was on the rotisserie. It would have been a lot easier to roll the plane versus climbing under it and squirting uphill. By the way, there is a paint bag system that allows you to hold the gun upside down and paint.

Each section of my 9A required 3 days. 1 day to build the jig that held the parts and enabled me to flip them over to do each side (such as the wings), one day to squirt paint, and the third day to tear it all apart and store the parts somewhere safe.

Here is an example of the jigs we welded together for the wings. After squirting one side, I allowed the paint to set for a couple of minutes, then flipped the wing over to do the other side. Although it's open in the photo, the garage door was closed during painting, the air coming into the shop was filtered, the floor was wet, and the air blowing out of the shop blew against wet towels to absorb any over spray so it didn't kill the desert foliage.

wingse.jpg


3) The Devilbiss Fine Line gun is first rate but make sure the air is clean, the regulator is at the gun (do not use Harbor Freight regulators), the feed is steady, and there are air driers along the line to avoid moisture.

4) Split the fresh paint into half gallons when the paint is originally mixed at the supply shop if you're going to work over many weeks. Therefore, when you open the next batch of paint, it isn't dried out and evaporated (color shift). Obviously, mix the paint so all of the solids are buoyant.

5) Try to create the same booth temps via heating or cooling or just be patient and wait for the right time of day. Different ambient temps & humidity will create different colors.

6) The fellow who told you to hold out a longer line of tape was right. You will get fewer deflections but don't stretch the tape or it could peel away when you need it most. Pin stripe your ex wife's car for practice. For that matter, paint your ex wife's car for practice.

7) With respect to your bleeding situation, sorry, I don't have an easy solution. You might want to extend one color over another to hide the bleed. I've solved a lot of problems with a $75 air brush and fine line tape.

8) Painting is a rhythmical process, much like dancing. Your arm moves in tandem with your weight shift always trying to remain at the same distance from the surface, the same speed, and right angle to the surface. Priming helps build the talent needed for top coat.

9) Don't use the Devilbiss for primer. An airplane paint job costs $8k and more so if you have to purchase another gun just for primer, you're still way ahead.

Painting is the culmination of a lot of hard work but it's the first thing folks see. Don't allow others to dissuade you from tackling difficult jobs like painting. Just because they are unwilling to apply themselves to difficult tasks, doesn't mean you can't do it. Hopefully, you have a few ex wives (haha) with cars that need painting so you'll get lots of practice before your pride and joy is ready.

Best of luck.
 
How's it look now?

It's been a couple of months since I started this thread. I've gone through a very steep learning curve, but I think that I've almost figured out how to paint an airplane. Too bad I've already (almost) finished painting before I figured it out!:D

This is a picture of my airplane taken at dusk this evening - sorry about the poor light but I really only did it so you can't see all of the mistakes and flaws!

The wings are done and hiding in a corner of the shop. Just need to finish off a couple of small items, and then start moving to the airport!

006.jpg
 
Last edited:
A friend of mine who was a car painter for over 20 years, during a downturn in the economy worked as an aircraft painter. He said there were a lot of differences between cars and planes, safety and union stuff that he did not deal with as an auto painter. But the biggest difference he said was the "20 Foot Rule" which stated that any mistake/blemish not visible at 20 feet was "Good Enough".

Your paint job looks much, much better than the "20 Foot Rule" well done.

Bob Parry
 
Unable to access pictures

Hi Scott,

Can you please check the link to your pictures, I'm unable to open it.

I'm heading down the same path that you have taken. I plan to paint before the first flight using the Stewart Systems paint. I have been using their Eco-prime for the interior parts and have been very satisfied. If you have any "new found wisdom" that you can share, please do. (The things you know now that you wished you knew when you first started)

Thanks,
Jake Lewis
 
Back
Top